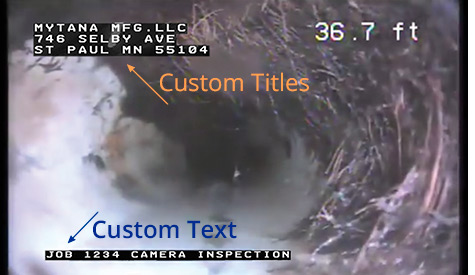
Using a USB Keyboard lets you change the overlays on your recordings
Custom Titles
- Add, change or reposition
Custom Text
Replaces the time/date stamp
- Add, change or reposition

You can also change the File Names of your videos and images
File Names
File names appear on your USB drive lists, or will display in Play Video menu screen
- Change – replaces the default file name (ex: 20171116-01.mp4) with your own text.

Finally, a keyboard can be used to change the Time Format on the time/stamp if you choose
In these instructions:
- screen menu items will be Bold,
- control panel button names will be ALL CAPS
Getting Started
Attach the keyboard to one of the USB ports on your camera or control box
Main Menu
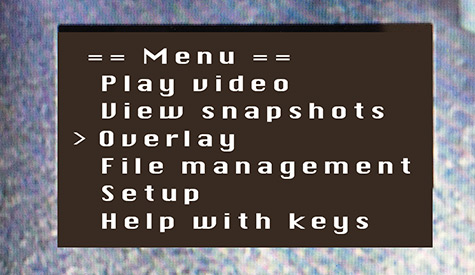
Use the arrow ▼▲ buttons on the control panel to toggle to (select) any menu item on the main screen—indicated by the >

Custom Titles
Add a Custom Title
- Push MENU/OK on control panel to access the Main Screen
- Select Overlay, then MENU/OK
- Select Secondary Overlay, then MENU/OK
- Select Title, then MENU/OK
- Enter your title using the keyboard.
If a 2nd line is needed, push MENU/OK to move cursor to the second line for typing
- Enter your title using the keyboard.
- Push STOP/BACK repeatedly to return to the Main Screen
Reposition Title on the screen
- Push MENU/OK on control panel to access the Main Screen
- Select Overlay, then MENU/OK
- Select Title Overlay, then MENU/OK
- Select movement you need, then press MENU/OK repeatedly until the title is in your desired location
Use the ▼▲ buttons to toggle between the movement choices - Push STOP/BACK repeatedly to return to the Main Screen
Remove a Title
- Push MENU/OK on control panel to access the Main Screen
- Select Overlay, then MENU/OK
- Select Title Overlay, then MENU/OK
- Select Edit Text, then MENU/OK
- Use backspace or Delete/Back on the keyboard to delete the title, then MENU/OK
- Push STOP/BACK repeatedly to return to the Main Screen
Custom Text
Adding Custom Text
- Push MENU/OK on control panel to access the Main Screen
- Select Overlay, then MENU/OK
- Select Set Up Primary Overlay, then MENU/OK
- Select Custom Text, then MENU/OK
- 5 custom text lines appear, select one then push MENU/OK
– Each selection allows 2 lines with 20 characters each
– You can enter all 5 custom names while you are here, or just one at a time - Push STOP/BACK repeatedly to return to the Main Screen
Reposition Custom Text on the screen
- Push MENU/OK on control panel to access the Main Screen
- Select Overlay, then MENU/OK
- Select Set Up Primary Overlay, then MENU/OK
- Select movement you need, then press MENU/OK repeatedly until the title is in your desired location.
Use the ▼▲ buttons to toggle between the movement choices - Push STOP/BACK repeatedly to return to the Main Screen
Delete Custom Text on a job
- Push MENU/OK on control panel to access the Main Screen
- Select Overlay, then MENU/OK
- Select Set Up Primary Overlay, then MENU/OK
- Select Custom Text, then MENU/OK
- Select custom text to remove, then MENU/OK
- Use backspace or Delete/Back keys to delete the title, then MENU/OK
- Push STOP/BACK repeatedly to return to the Main Screen
To Replace Custom Text with a time/date stamp
(No Keyboard Needed)
- Push MENU/OK on control panel to access the Main Screen
- Select Overlay, then MENU/OK
–Check that Primary Overlay at the top of the Overlays menu has 16 x 16 showing.
– 16 x 16 is the display size of the time stamp,
– 8 x 13 also shows the stamp but very small.
– None will display nothing and the following steps won’t work.
– Press the MENU/OK while the arrow is next to Primary Overlay to toggle between these... once it says 16x16, continue on. - Select Set Up Primary Overlay (2nd menu item) then MENU/OK
- Select Text , then MENU/OK
- Select ^d^t , then MENU/OK
Time/date stamp will display with CURRENT time/date - Push STOP/BACK repeatedly to return to the Main Screen
To Find jobs with Custom Text
(No Keyboard Needed)
- Push MENU/OK on control panel to access the Main Screen
- Select Overlay, then MENU/OK
- Select Set Up Primary Overlay , then MENU/OK
- Select Custom Text, then MENU/OK
- Choose the job you want to record that you have already named, then MENU/OK
– To display text, push MENU/OK - Push STOP/BACK repeatedly to return to the Main Screen and continue with recording
File Names
To Change a File Name
- Push MENU/OK on control panel to access the Main Screen
- Select File Management, then MENU/OK
- Select Rename, then MENU/OK
- Select Internal, External or Both, then MENU/OK
- Rename files
**Important** Type in .mp4 at the end of the file name for videos, or .jpg at the end of the file name for snapshots– be sure to include the . (dot).
– Failure to add these extensions could result in losing your recording
Press MENU/OK - Push STOP/BACK repeatedly to return to the Main Screen
Time
To Change Time Format
(No Keyboard Needed)
- Select Overlays, then MENU/OK
- Select Primary Overlay, then MENU/OK
- Select Time Format, then MENU/OK
- There are 7 options to choose from,
Select HH:MM AM/PM, then MENU/OK - Push STOP/BACK repeatedly to return to the Main Screen
